EventFull React Client
Part 2
| Repo | Starter Code | Finished Code |
|---|---|---|
| Rails API | 02_start | 02_end |
| React Client | 02_start | 02_end |
If you’d like to code along with me here, clone down the repos to your machine and checkout the 02_start branch in each. For rails, boot up your server like this: rails s -p 3001. For react, yarn start should do it.
The video for this part of the series starts with a discussion of the plan for the components we’re going to build out during this lesson.
We’re basing our plan on the client side routes that our application will have and how they will be structured. To build our plan, we need to answer the following questions:
What path will be visible in the URL bar?
What API endpoints are involved?
What React component(s) will be rendered?
Then for each of the components in the last answer, address the following conerns:
What state do we need for this component?
What props do we need for this component?
Do we need componentDidMount (or useEffect) here? If so, what is it that
should happen after the component renders?
What event handlers are required? Will the listener(s) be attached in this
component or will the handler(s) be passed as props to child components?
What possible values for state and props will affect the rendered content?
I’ve added those to this spreadsheet that you can copy and use for your own purposes.
We get started writing code at around the 14:30 mark in the video. We start by creating the client:
npx create-react-app eventfull-react-client
Then we set up a remote repo that we connect to it. The way I’m using GitHub for this project is I’m creating a branch for the start and end of each video and pushing both to GitHub (for the rails api repo and the react client repo). So, if you’re jumping into the middle of the tutorial, just clone the repo and checkout that branch for the start of that part of the series.
Because the plan we made is focused on client side routes, the first thing we’re going to do is add the react router library.
Setting up React Router
yarn add react-router-dom
But, before we start filling out our routes and components, let’s clear out the boilerplate from create-react-app.
- Remove the index.css file, logo.svg, reportWebVitals, setupTests.js and App.css and App.test.js.
- Remove logos from public folder.
- Remove all references in index.js and App.js to the removed files
- Clear out the App component so it’s empty
- Run
yarn startto make sure the server boots up and we see an empty screen
Now that we’ve cleaned house, we can add our routes. So, in App.js, we’re going to want to import some components from react-router-dom.
import React from 'react'
import {
  BrowserRouter as Router,
  Switch,
  Route,
  NavLink,
} from 'react-router-dom'
Later on, we’re going to split off the navigation into a separate component, but we’ll keep it in App for the moment.
A Brief Aside About Directory Structure
Before we move too far forward, let’s have a conversation about directory structure. For an app of the size we’re going to build, we could approach is:
src/App.js
src/index.js
src/components/
src/containers/
src/ui/
Later, when we add redux we’ll want to add a couple of additional directories for actions and reducers. In a small app like this we can just have this simple directory structure that isn’t many layers deep. But, if we had a situation where our app had 100s of components, we might want to think about grouping them differently and maybe having subdirectories for sections of the application. For example:
src/groups/containers/
src/groups/components/
src/events/containers/
src/events/components/
For this project having something like this would work fine:
src/index.js
src/app.js
src/actions/
src/components/
src/containers/
src/reducers/
Since we’re starting with groups, we’ll want to have our containers and components directories. So we can make those now
mkdir src/containers
mkdir src/components
Next, we can add the 4 components we’ll need:
touch src/containers/GroupsIndexContainer.js
touch src/containers/GroupFormContainer.js
touch src/components/GroupsList.js
touch src/components/GroupListItem.js
We want to make things look nice, so let’s add tailwindcss to the public/index.html file. You’ll want to add this line to the <head> tag in the index.html file.
<link
  href="https://unpkg.com/tailwindcss@^2/dist/tailwind.min.css"
  rel="stylesheet"
/>
Now we’ll be able to use tailwind classes within our react components. We’re going to have a container component (one that has state/is connected to our redux store when we have one) connected to each of our RESTful routes. Because we’re going to have routes for the containers, we need to import them into App.js.
import GroupsIndexContainer from './containers/GroupsIndexContainer'
import GroupFormContainer from './containers/GroupFormContainer'
Then, we need to add a switch statement to the App function’s returned jsx:
<Router>
  <Switch>
    <Route exact path="/">
      Groups
    </Route>
    <Route path="/groups/new">New Group</Route>
  </Switch>
</Router>
In order to make better use of these routes, we want to have a navbar as well, so that users can navigate from route to route more easily. So let’s add that within the router and let’s also add some classes to indicate which route is currently active. We pass the active prop to the NavLink tag to ensure that the activeClassName is only applied to that NavLink if the route exactly matches the url.
import React from 'react'
import {
  BrowserRouter as Router,
  Switch,
  Route,
  NavLink,
} from 'react-router-dom'
import GroupsIndexContainer from './containers/GroupsIndexContainer'
import GroupFormContainer from './containers/GroupFormContainer'

function App() {
  return (
    <div className="App">
      <Router>
        <nav className="text-center bg-blue-900 text-yellow-100 p-4">
          <NavLink
            className="inline-block px-4 py-2"
            activeClassName="text-yellow-300"
            exact
            to="/"
          >
            Groups
          </NavLink>
          <NavLink
            className="inline-block px-4 py-2"
            activeClassName="text-yellow-300"
            exact
            to="/groups/new"
          >
            New Group
          </NavLink>
        </nav>
        <Switch>
          <Route exact path="/">
            Groups
          </Route>
          <Route path="/groups/new">New Group</Route>
        </Switch>
      </Router>
    </div>
  )
}

export default App
Now that we have these routes set up, let’s hook them up to the components.
<Switch>
  <Route exact path="/">
    <GroupsIndexContainer />
  </Route>
  <Route path="/groups/new">
    <GroupFormContainer />
  </Route>
</Switch>
If we try this out in the browser, we’ll see an error that looks like this:
Error: Element type is invalid: expected a string (for built-in components) or a class/function (for composite components) but got: object. You likely forgot to export your component from the file it's defined in, or you might have mixed up default and named imports.

Check the render method of `App`.
If you see an error like this, it could be caused by any of the possible explanations mentioned in the last sentence there. But, I’ve found when it happens to me it’s usually that I haven’t actually exported from the file I’m importing from yet. In this case, that’s what the problem is, so let’s add our GroupsIndexContainer and make it the default export.
import React, { Component } from 'react'

export default class GroupsIndexContainer extends Component {
  state = {
    groups: [],
    loading: true,
  }

  render() {
    return (
      <section className="max-w-6xl mx-auto mt-16">
        {this.state.loading
          ? 'loading spinner'
          : '<GroupsList groups={this.state.groups} />'}
      </section>
    )
  }
}
Now, to simulate the loading process, we can introduce componentDidMount and add our GroupsList component. To simulate the loading time, we can use setTimeout and run the setState after a second has passed.
// src/containers/GroupsIndexContainer.js
import React, { Component } from 'react'
import GroupsList from '../components/GroupsList'

export default class GroupsIndexContainer extends Component {
  state = {
    groups: [],
    loading: true,
  }

  componentDidMount() {
    setTimeout(() => {
      this.setState({
        groups: [
          { name: 'software-engineering-052620' },
          { name: 'software-engineering-071519' },
        ],
        loading: false,
      })
    }, 1000)
  }

  render() {
    return (
      <section className="max-w-6xl mx-auto mt-16">
        {this.state.loading ? (
          'loading spinner'
        ) : (
          <GroupsList groups={this.state.groups} />
        )}
      </section>
    )
  }
}
Here’s what the GroupsList component will look like.
// src/components/GroupsList.js
import React from 'react'
import GroupListItem from './GroupListItem'

const GroupsList = ({ groups }) => {
  return (
    <>
      <h1>GroupsList</h1>
      <ul>
        {groups.map((group) => (
          <GroupListItem key={group.id} group={group} />
        ))}
      </ul>
    </>
  )
}

export default GroupsList
This component will accept groups as a prop, so we’re destructuring that here in the arguments list. We’ll be iterating over the groups and rendering a list item for each, so here’s that component:
// src/components/GroupListItem.js
import React from 'react'

const GroupListItem = ({ group }) => {
  return (
    <li className="" key={group.id}>
      {group.name}
    </li>
  )
}

export default GroupListItem
We’ll be adding some classes here later to make it look a little nicer, but for now we’re just adding the prop so we can pull them in later.
Next, we want to set this up so we can actually test this out. In order to do that, we need some data in our database so we can fetch it from the API.
Adding Some Seeds
In db/seeds.rb, add the following lines:
# db/seeds.rb
group1 = Group.find_or_create_by(name: 'software-engineering-052620')
group2 = Group.find_or_create_by(name: 'software-engineering-071519')
Then to add these, run:
rails db:seed
We can check in Postico that these records have indeed been added (or you can just use rails console if you like). After you’ve made sure that you’ve got these records in the db, we can move on to fetching it from the API in our react components.
Fetching From the API in componentDidMount
We can take our componentDidMount in the GroupsIndexContainer and make it actually fetch data from the API
componentDidMount() {
  // we'd probably want to store the API_URL in an environment variable
  // so this would work in deployment as well but for now we'll hard code the hostname
  fetch('http://localhost:3000/groups', {
    method: 'get',
    headers: {
      'Accept': 'application/json',
      'Content-Type': 'application/json'
    }
  })
    .then(res => res.json())
    .then(groupsJson => {
      console.log('groups', groupsJson)
      this.setState({
        groups: groupsJson,
        loading: false
      })
    })
}
If you see an error like this:
GroupsIndexContainer.js:14 GET http://localhost:3000/groups 404 (Not Found)
componentDidMount @ GroupsIndexContainer.js:14
commitLifeCycles @ react-dom.development.js:20663
commitLayoutEffects @ react-dom.development.js:23426
callCallback @ react-dom.development.js:3945
invokeGuardedCallbackDev @ react-dom.development.js:3994
invokeGuardedCallback @ react-dom.development.js:4056
commitRootImpl @ react-dom.development.js:23151
unstable_runWithPriority @ scheduler.development.js:646
runWithPriority$1 @ react-dom.development.js:11276
commitRoot @ react-dom.development.js:22990
performSyncWorkOnRoot @ react-dom.development.js:22329
(anonymous) @ react-dom.development.js:11327
unstable_runWithPriority @ scheduler.development.js:646
runWithPriority$1 @ react-dom.development.js:11276
flushSyncCallbackQueueImpl @ react-dom.development.js:11322
flushSyncCallbackQueue @ react-dom.development.js:11309
discreteUpdates$1 @ react-dom.development.js:22420
discreteUpdates @ react-dom.development.js:3756
dispatchDiscreteEvent @ react-dom.development.js:5889
localhost/:1 Uncaught (in promise) SyntaxError: Unexpected token < in JSON at position 0
You can check the network tab in the chrome console and see what it shows you. In our case it looks like this:
<!DOCTYPE html>
<html lang="en">
  <head>
    <meta charset="utf-8" />
    <title>Error</title>
  </head>
  <body>
    <pre>Cannot GET /groups</pre>
  </body>
</html>
When you see this:
localhost/:1 Uncaught (in promise) SyntaxError: Unexpected token < in JSON at position 0
That’s a signal that you’ve got some code that’s trying to parse an html file as JSON. In particular, if you’ve got a fetch call that returns a promise for a response and you try to parse that response as JSON but it’s in fact in HTML format, this will be the error that you’ll see.
In our case we made a request to the port running our react dev server not the one running our api. So when we boot up the rails api, we need to run it on a separate port.
rails s -p 3001
Now we can update our url to localhost:3001 and we should get something better.
If we visit : http://localhost:3001/groups
we should see
[
  {
    "id": 1,
    "name": "software-engineering-052620",
    "created_at": "2021-02-24T00:36:06.684Z",
    "updated_at": "2021-02-24T00:36:06.684Z"
  },
  {
    "id": 2,
    "name": "software-engineering-071519",
    "created_at": "2021-02-24T00:36:06.698Z",
    "updated_at": "2021-02-24T00:36:06.698Z"
  }
]
So, if we update the url to be http://localhost:3001/groups instead of http://localhost:3000/groups.
// src/containers/GroupsIndexContainer.js
componentDidMount() {
  // we'd probably want to store the API_URL in an environment variable
  // so this would work in deployment as well but for now we'll hard code the hostname
  fetch('http://localhost:3001/groups', {
    method: 'get',
    headers: {
      'Accept': 'application/json',
      'Content-Type': 'application/json'
    }
  })
    .then(res => res.json())
    .then(groupsJson => {
      console.log('groups', groupsJson)
      this.setState({
        groups: groupsJson,
        loading: false
      })
    })
}
Now, when we load up the page in the browser, we should see the 2 groups appear on the page. We
Adding the New Group Form
Now, we’re going to be adding in our GroupFormContainer
// src/containers/GroupFormContainer
import React, { Component } from 'react'

export default class GroupFormContainer extends Component {
  state = {
    name: '',
  }

  render() {
    return (
      <form className="max-w-6xl w-3/4 mx-auto mt-16 shadow-lg px-4 py-6">
        <h1 className="text-center text-3xl font-semibold mb-2">New Group</h1>
        <fieldset>
          <input
            type="text"
            name="name"
            value={this.state.name}
            placeholder="Name your group"
            className="w-full border p-4 my-4"
          />
        </fieldset>
        <button
          className="w-full p-4 bg-blue-300 mt-4 hover:bg-blue-400 transition-all duration-200"
          type="submit"
        >
          Add Group
        </button>
      </form>
    )
  }
}
Also, we need to hook this component up to the route we built earlier in App.js.
// src/App.js
// ...
<Switch>
  <Route exact path="/">
    <GroupsIndexContainer />
  </Route>
  <Route path="/groups/new">
    <GroupFormContainer />
  </Route>
</Switch>
Now, we’ll be able to see the form in the browser when we visit the appropriate route. But, if we do it now, we won’t be able to interact with the from yet. To get that working, we’ll need to add the event listeners to our component.
// src/containers/GroupFormContainer.js
import React, { Component } from 'react'

export default class GroupFormContainer extends Component {
  state = {
    name: '',
  }

  handleChange = (e) => {
    this.setState({
      [e.target.name]: e.target.value,
    })
  }

  handleSubmit = (e) => {
    e.preventDefault()
    fetch('http://localhost:3001/groups', {
      method: 'POST',
      headers: {
        Accept: 'application/json',
        'Content-Type': 'application/json',
      },
      body: JSON.stringify({ group: this.state }),
    })
      .then((res) => res.json())
      .then((groupJson) => {
        this.props.history.push('/')
      })
  }

  render() {
    return (
      <form
        onSubmit={this.handleSubmit}
        className="max-w-6xl w-3/4 mx-auto mt-16 shadow-lg px-4 py-6"
      >
        <h1 className="text-center text-3xl font-semibold mb-2">New Group</h1>
        <fieldset>
          <input
            type="text"
            name="name"
            onChange={this.handleChange}
            value={this.state.name}
            placeholder="Name your group"
            className="w-full border p-4 my-4"
          />
        </fieldset>
        <button
          className="w-full p-4 bg-blue-300 mt-4 hover:bg-blue-400 transition-all duration-200"
          type="submit"
        >
          Add Group
        </button>
      </form>
    )
  }
}
For handleChange, we make that an arrow function so that we can access the setState method when that event handler gets called. If we define it as an arrow function, then we won’t need to bind its context because arrow functions inherit the context they’re defined in and will never have a different value for this than the one they inherit.
handleChange = (e) => {
  this.setState({
    [e.target.name]: e.target.value,
  })
}
Also, this is a pattern that we can use for any controlled form as we’re using a computed property for the key in state. As long as our inputs all have a name attribute that matches their key in state, this same handleChange event handler will work for all of our inputs and select tags.
In our handleSubmit, we’ll be making a POST request to /groups to allow creating groups. We’ll add the headers for json format and then promise callbacks to handle parsing the response as json format. Finally, after we get a response back from the server, we’d like to trigger a client side redirect so we can view the list of groups again.
handleSubmit = (e) => {
  e.preventDefault()
  fetch('http://localhost:3001/groups', {
    method: 'POST',
    headers: {
      Accept: 'application/json',
      'Content-Type': 'application/json',
    },
    body: JSON.stringify({ group: this.state }),
  })
    .then((res) => res.json())
    .then((groupJson) => {
      this.props.history.push('/')
    })
}
In order to trigger a client side redirect, we need to access the browser’s history object and push in a new url. This will add this url to the browser history (so it will show up in the collection of urls accessible via the browser’s forward adn back buttons). However, if we do this at the moment, we’ll get an error that looks something like this:
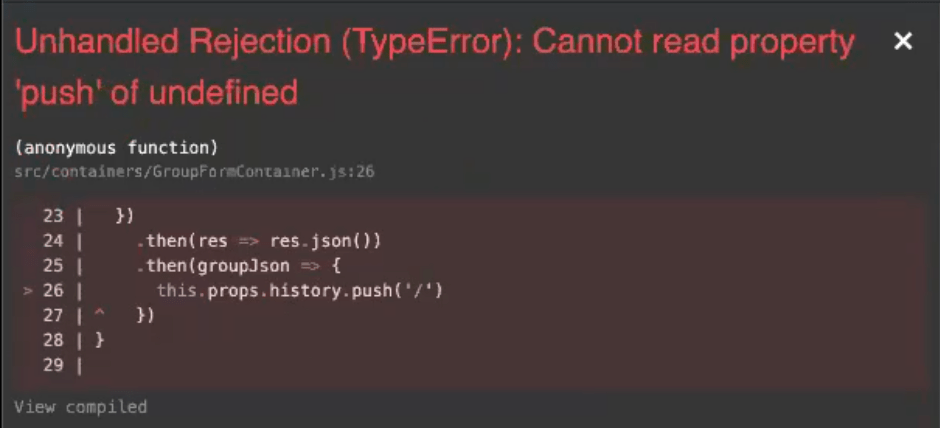
The error will point us to the line this.props.history.push('/'). The issue is that the history prop isn’t being added to the component. This history prop is one defined by react router and passed to our components that are hooked up as routes. The issue here, though, is how we defined the route in App.js. If we want the router props to be passed to the component, we can’t just make the component a child of the route like so:
<Route path="/groups/new">
  <GroupFormContainer />
</Route>
There are a couple of ways we can make sure that we have access to react router props within the GroupFormContainer. One is to use the component attribute for the <Route>.
<Route path="/groups/new" component={GroupFormContainer} />
If we set up the route this way, React Router will pass in the 3 router props: history, match and location automatically. Once those props are available, the redirect should work. When we submit the form, the client side router will switch back to / and we’ll see the GroupsIndexContainer which will now include the group we just added.