React Redux Authentication
For this tutorial, you can use the repo from my Devise JWT tutorial as a backend for the application. Once you’ve cloned it, you can run it on port 3001:
rails s
Next, we’ll want to spin up a new react app to handle our redux auth demo.
npx create-react-app react-redux-auth-client
Okay, so after we’ve got our react application set up, we’re going to have to add some dependencies here so we can set up our demo.
yarn add redux react-redux redux-thunk redux-devtools-extension react-router-dom
Configuring the store
After we’ve got some dependencies working, we’ll want to configure our store, set up the middleware and hook it up to our application.
Now, let’s get rid of the boilerplate from create-react-app:
cd src
rm App.css App.test.js index.css logo.svg reportWebVitals.js setupTests.js
touch store.js
cd ..
Here’s where we’ll create and export the store, hook up the redux-thunk middleware and configure the redux-devtools-extension
// src/store.js
import { createStore, applyMiddleware } from 'redux'
import { composeWithDevTools } from 'redux-devtools-extension'
import thunk from 'redux-thunk'
import rootReducer from './reducers'

export default createStore(
  rootReducer,
  composeWithDevTools(applyMiddleware(thunk))
)
To get this working, we’ll also need to create the rootReducer.
mkdir src/reducers
touch src/reducers/index.js
And then we’ll import combineReducers and eventually we’ll add some reducers that we’ll import as well, but for now, we’re just going to export the rootReducer that accepts an object with an auth property pointing to a function that returns a 'testing' string.
// src/reducers/index.js
import { combineReducers } from 'redux'

export default combineReducers({
  auth: (state, action) => 'testing',
})
Now, we’ll hook up our application to the store by updating our index.js file:
// src/index.js
import React from 'react'
import ReactDOM from 'react-dom'
import App from './App'
import { Provider } from 'react-redux'
import store from './store'

ReactDOM.render(
  <React.StrictMode>
    <Provider store={store}>
      <App />
    </Provider>
  </React.StrictMode>,
  document.getElementById('root')
)
And, we’ve got to rework the App component to remove all references to other files that we removed.
// src/App.js
function App() {
  return <div className="App">App component</div>
}

export default App
Now, we want to test our our devtools to see if we can get some feedback from the browser. So, let’s boot up the dev server and check out http://localhost:3000
yarn start
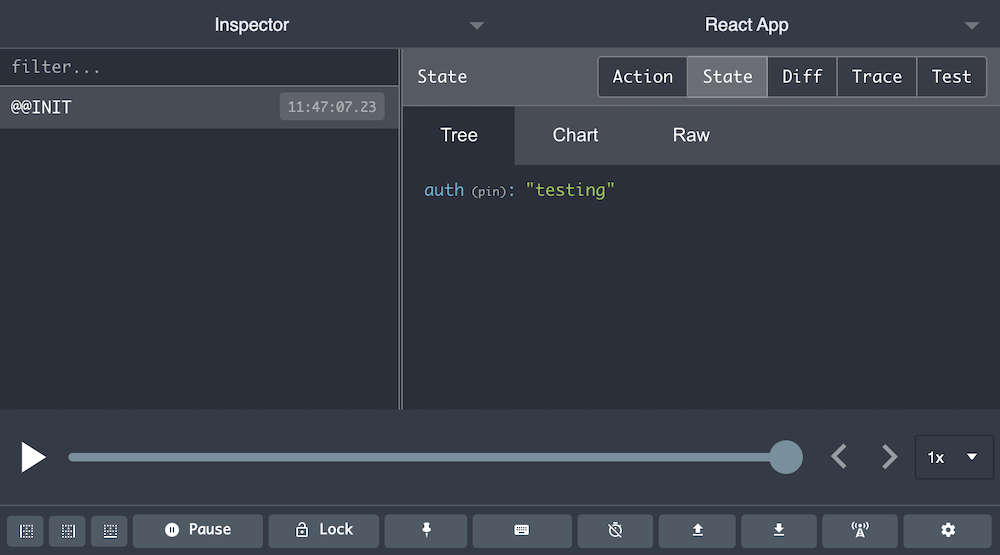
Okay, so we’re getting feedback from the devtools now. Moving forward, our goal is to add a couple of client side routes to our application, one of which will be a protected route. This route should only be accessible if we’re logged in.
Visualizing Auth
Before we hop into the code, let’s look at some diagrams of how the pieces will fit together.
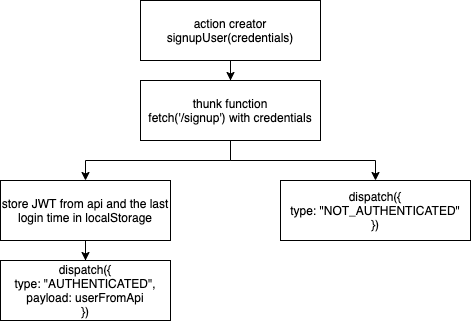
So, Redux will know if we’ve checked to see if we have an active session. We’ll want this so we can show a loading spinner before we’ve gotten the result. It will also know if we have an active session, and it’ll have access to the current user as well. We’re going to be storing a JWT in localStorage that we’ll use to communicate with the server and identify the currently logged in user. But, this information won’t live in the store. Instead, we’ll be storing the token when we send fetch requests to /signup and /login within our action creators. We’ll also read the data out of localStorage in order to send an Authorization header along with requests to our rails api.
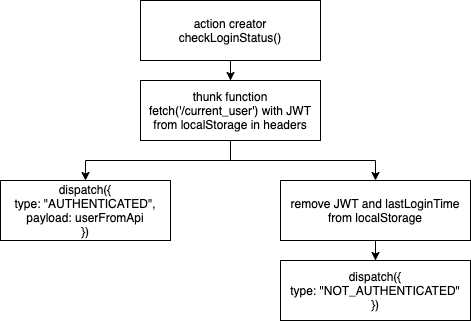
We’ll have a checkLoginStatus() action creator function that will hit an endpoint on our api to return the current_user given the jwt in the Authorization headers. If we get the current_user back (200 status code), then we dispatch the AUTHENTICATED action add the user to the store. If we don’t get a user back (401 status code), we dispatch NOT_AUTHENTICATED, which will update the store indicating that we have checked to see if we have an active session and that we don’t. We’ll also remove the token and the last login time from localStorage at that point.
We want to add these action creators:
mkdir src/actions/
touch src/actions/auth.js
touch src/actions/index.js
Then we’ll add our action types to actions/index.js
export const AUTHENTICATED = 'AUTHENTICATED'
export const NOT_AUTHENTICATED = 'NOT_AUTHENTICATED'
And we’ll utilize them in our signupUser action creator. We’re also going to add a couple of functions here that will store and retrieve the JWT (JSON Web Token) that will come back in the headers of the response from a successful registration. We’ll call the functions setToken() and getToken(). In signup and login, we’ll use setToken(). In logout, we’ll use getToken(). Any subsequent requests that require authentication an also make use of the getToken() method.
// src/actions/auth.js
import { AUTHENTICATED, NOT_AUTHENTICATED } from '.'

const setToken = (token) => {
  localStorage.setItem("token", token);
  localStorage.setItem("lastLoginTime", new Date(Date.now()).getTime());
};

const getToken = () => {
  const now = new Date(Date.now()).getTime();
  const thirtyMinutes = 1000 * 60 * 30;
  const timeSinceLastLogin = now - localStorage.getItem("lastLoginTime");
  if (timeSinceLastLogin < thirtyMinutes) {
    return localStorage.getItem("token");
  }
};
We’re using thirtyMinutes as our time here, because the devise configuration for the rails api specifies that the token will expire in 30 minutes:
config.jwt do |jwt|
    jwt.secret = Rails.application.credentials.fetch(:secret_key_base)
    jwt.dispatch_requests = [
      ['POST', %r{^/login$}]
    ]
    jwt.revocation_requests = [
      ['DELETE', %r{^/logout$}]
    ]
    jwt.expiration_time = 30.minutes.to_i
end
For the signupUser action, we’ll want to persist the token to localStorage if we get an ok response. To do this, we’ll use the setToken function defined above.
// src/actions/auth.js
// ...

export const signupUser = (credentials) => {
  return (dispatch) => {
    return fetch("http://localhost:3001/signup", {
      method: "POST",
      headers: {
        Accept: "application/json",
        "Content-Type": "application/json"
      },
      body: JSON.stringify({ user: credentials })
    }).then((res) => {
      if (res.ok) {
        setToken(res.headers.get("Authorization"));
        return res
          .json()
          .then((userJson) =>
            dispatch({ type: AUTHENTICATED, payload: userJson })
          );
      } else {
        return res.json().then((errors) => {
          dispatch({ type: NOT_AUTHENTICATED });
          return Promise.reject(errors);
        });
      }
    });
  };
};
We’re checking the ok status of the response here and if we see an ok status code, then we invoke the setToken function to store the token in the response header in localStorage. Next, we return the body parsed as json as a resolved promise. If the response is not ok, we’ll return a rejected promise and dispatch the NOT_AUTHENTICATED action in the process.
In order to see this one in action, we’ll need to add in a reducer to handler auth.
touch src/reducers/auth.js
// src/reducers/auth.js
import { AUTHENTICATED, NOT_AUTHENTICATED } from "../actions";
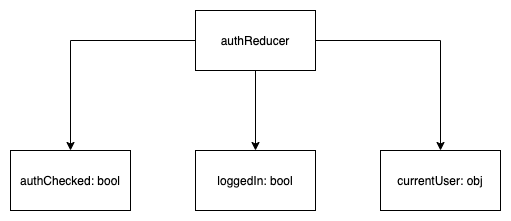
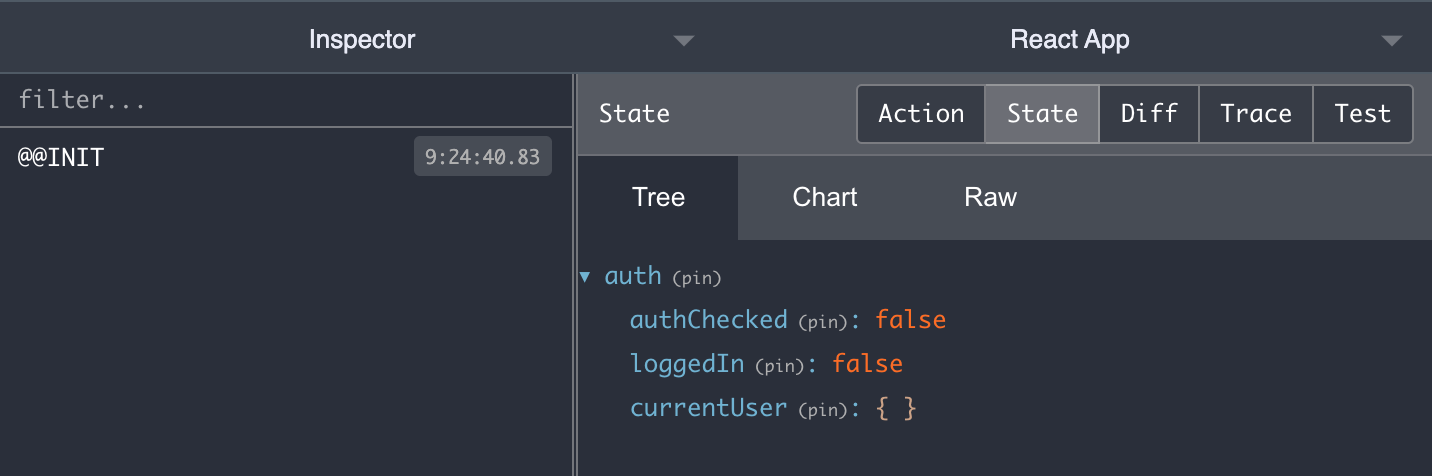
const initialState = {
authChecked: false,
loggedIn: false,
currentUser: {}
};
export default function authReducer(state = initialState, action) {
switch (action.type) {
case AUTHENTICATED:
return {
authChecked: true,
loggedIn: true,
currentUser: action.payload,
};
case NOT_AUTHENTICATED:
return {
authChecked: true,
loggedIn: false,
currentUser: {}
};
default:
return state;
}
}
We’ll handle any errors that we need to display by ensuring that our action creator is returning a rejected promise if something goes wrong. This way, we won’t need to store any errors in the store, as we’re going to return a rejected promise for those errors. Then, we’ll be able to consume the errors in a catch within the react component that triggers our dispatch.
We need to hook up our reducer to the rootReducer and then we can confirm that it’s working in the Redux DevTools.
// src/reducers/index.js
import { combineReducers } from 'redux'
import authReducer from './auth'

export default combineReducers({
  auth: authReducer
})
We can check out the devtools to see that our reducer is working properly.
We’re also going to want to add in additional action creators to handle login and logout as well.
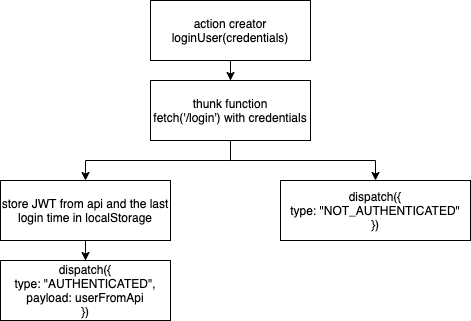
export const loginUser = (credentials) => {
  return (dispatch) => {
    return fetch("http://localhost:3001/login", {
      method: "POST",
      headers: {
        Accept: "application/json",
        "Content-Type": "application/json",
      },
      body: JSON.stringify({ user: credentials }),
    }).then((res) => {
      if (res.ok) {
        setToken(res.headers.get("Authorization"));
        return res
          .json()
          .then((userJson) =>
            dispatch({ type: AUTHENTICATED, payload: userJson })
          );
      } else {
        return res.json().then((errors) => {
          dispatch({ type: NOT_AUTHENTICATED });
          return Promise.reject(errors);
        });
      }
    });
  };
};

export const logoutUser = () => {
  return (dispatch) => {
    return fetch("http://localhost:3001/logout", {
      method: "DELETE",
      headers: {
        Accept: "application/json",
        "Content-Type": "application/json",
        Authorization: getToken(),
      },
    }).then((res) => {
      if (res.ok) {
        return dispatch({ type: NOT_AUTHENTICATED });
      } else {
        return res.json().then((errors) => {
          dispatch({ type: NOT_AUTHENTICATED });
          return Promise.reject(errors);
        });
      }
    });
  };
};
Handling the React Side
Now that we’ve got the redux portion of our authentication logic, we’ll want to add React components that will interact with these actions and update the store. We’ll have a few tasks to accomplish:
- Create a
<Signup/>component - Create a
<Login />component - Create a
<Logout />button component - Create a
<Navbar />component - Add a couple of routes to our application so we can see our auth flow in action when we try to visit a protected route when we’re not logged in.
- Create a
withAuthhigher order component to create a protected component (or route) - Configuring authentication based NavLinks
Creating the components
Let’s start off by creating the <Signup /> component.
mkdir -p src/components/auth
touch src/components/auth/Signup.js
touch src/components/auth/Login.js
touch src/components/auth/Logout.js
Creating the <Signup /> component
Then fill out the Signup component.
// src/components/auth/Signup.js
import React from "react";
import { connect } from "react-redux";
import { signupUser } from "../../actions/auth";

class Signup extends React.Component {
  state = {
    email: "",
    password: "",
    errors: {status: {message: ""}}
  };

  handleChange = (event) => {
    this.setState({
      [event.target.name]: event.target.value
    });
  };

  handleSubmit = (event) => {
    event.preventDefault();
    const { email, password } = this.state;
    this.props
      .dispatchSignupUser({ email, password })
      .then(() => this.props.history.push("/"))
      .catch((errors) => this.setState({ errors }));
  };

  render() {
    return (
      <form
        onSubmit={this.handleSubmit}
        className='w-11/12 max-w-2xl mx-auto mt-8'
      >
        <h1 className='font-bold text-3xl mb-2'>Sign Up</h1>
        <p className='h-8 text-red-400'>{this.state.errors.status.message}</p>
        <fieldset>
          <label className='block uppercase mb-2' htmlFor='email'>
            Email:
          </label>
          <input
            type='text'
            name='email'
            id='email'
            className='w-full border-2 focus:outline-none focus:ring-2 p-4 mb-4'
            onChange={this.handleChange}
            value={this.state.email}
          />
        </fieldset>
        <fieldset>
          <label className='block uppercase mb-2' htmlFor='password'>
            Password:
          </label>
          <input
            type='password'
            name='password'
            id='password'
            className='w-full border-2 focus:outline-none focus:ring-2 p-4 mb-4'
            onChange={this.handleChange}
            value={this.state.password}
          />
        </fieldset>
        <input
          className='w-full text-center uppercase p-4 bg-blue-300 cursor-pointer mt-4'
          type='submit'
          value='Sign Up'
        />
      </form>
    );
  }
}

const mapDispatchToProps = (dispatch) => {
  return {
    dispatchSignupUser: (credentials) => dispatch(signupUser(credentials))
  };
};

export default connect(null, mapDispatchToProps)(Signup);
Creating the <Login /> component
And next the Login component:
// src/components/auth/Login.js
import React from "react";
import { connect } from "react-redux";
import { loginUser } from "../../actions/auth";

class Login extends React.Component {
  state = {
    email: "",
    password: "",
    error: false
  };

  handleChange = (event) => {
    this.setState({
      [event.target.name]: event.target.value
    });
  };

  handleSubmit = (event) => {
    event.preventDefault();
    const { email, password } = this.state;
    this.props
      .dispatchLoginUser({ email, password })
      .then(() => this.props.history.push("/"))
      .catch(() => this.setState({ error: true }));
  };

  render() {
    return (
      <form
        onSubmit={this.handleSubmit}
        className='w-11/12 max-w-2xl mx-auto mt-8'
      >
        <h1 className='font-bold text-3xl'>Log In</h1>
        <p className="h-8 text-red-400">{this.state.error && "Invalid email or password"}</p>
        <fieldset>
          <label className='block uppercase mb-2' for='email'>
            Email:
          </label>
          <input
            type='text'
            name='email'
            id='email'
            className='w-full border-2 focus:outline-none focus:ring-2 p-4 mb-4'
            onChange={this.handleChange}
            value={this.state.email}
          />
        </fieldset>
        <fieldset>
          <label className='block uppercase mb-2' for='password'>
            Password:
          </label>
          <input
            type='password'
            name='password'
            id='password'
            className="w-full border-2 focus:outline-none focus:ring-2 p-4 mb-4"
            onChange={this.handleChange}
            value={this.state.password}
          />
        </fieldset>
        <input
          className='w-full text-center uppercase p-4 bg-blue-300 cursor-pointer mt-4'
          type='submit'
          value='Log In'
        />
      </form>
    );
  }
}

const mapDispatchToProps = (dispatch) => {
  return {
    dispatchLoginUser: (credentials) => dispatch(loginUser(credentials))
  };
};

export default connect(null, mapDispatchToProps)(Login);
Creating the <Logout /> button
Finally, the Logout button.
// src/components/auth/Logout.js
import React from "react";
import { connect } from "react-redux";
import { logoutUser } from "../../actions/auth";
import { useHistory } from "react-router-dom";

const Logout = ({ dispatchLogoutUser }) => {
  const history = useHistory();

  const handleClick = () => {
    dispatchLogoutUser().then(() => history.push("/"));
  };

  return (
    <button className='p-4' onClick={handleClick}>
      Logout
    </button>
  );
};

const mapDispatchToProps = (dispatch) => {
  return {
    dispatchLogoutUser: () => dispatch(logoutUser())
  };
};

export default connect(null, mapDispatchToProps)(Logout);
Creating the Navbar
Next step here is to create a Navbar and some client side routes that point to our components. We’ll have routes for our signup and login components. We’ll also want to create a home route that everyone should be able to see and a protected route that you should have to be logged in to view.
touch src/components/Navbar.js
// src/components/Navbar.js
import React from "react";
import { connect } from "react-redux";
import { NavLink } from "react-router-dom";

const Navbar = ({ authChecked, loggedIn, currentUser }) => {
  return (
    <nav className='bg-blue-50 text-blue-500'>
      <div className='w-11/12 max-w-6xl mx-auto grid sm:grid-cols-3 md:grid-cols-4'>
        <div className='sm:col-span-2 md:col-span-3'>
          <NavLink
            className='p-4 block sm:inline-block'
            activeClassName='text-blue-900'
            exact
            to='/'
          >
            NormalRoute
          </NavLink>
          <NavLink
            className='p-4 block sm:inline-block'
            activeClassName='text-blue-900'
            exact
            to='/protected_route'
          >
            ProtectedRoute
          </NavLink>
        </div>
        <div className='sm:text-right'>
          <NavLink
            className='p-4 inline-block'
            activeClassName='text-blue-900'
            exact
            to='/signup'
          >
            Sign Up
          </NavLink>
          <NavLink
            className='p-4 inline-block'
            activeClassName='text-blue-900'
            exact
            to='/login'
          >
            Log In
          </NavLink>
        </div>
      </div>
    </nav>
  );
};

const mapStateToProps = ({ auth: { authChecked, loggedIn, currentUser } }) => {
  return { authChecked, loggedIn, currentUser };
};

export default connect(mapStateToProps)(Navbar);
Adding client side routes
And now, let’s add the routes to our App.js component.
// src/App.js
import { BrowserRouter as Router, Route, Switch } from "react-router-dom";
import Navbar from "./components/Navbar";
import NormalRoute from "./components/NormalRoute";
import ProtectedRoute from "./components/ProtectedRoute";
import Signup from "./components/auth/Signup";
import Login from "./components/auth/Login";

function App() {
  return (
    <div className='App'>
      <Router>
        <Navbar />
        <Switch>
          <Route exact path='/' component={NormalRoute} />
          <Route exact path='/protected_route' component={ProtectedRoute} />
          <Route exact path='/signup' component={Signup} />
          <Route exact path='/login' component={Login} />
        </Switch>
      </Router>
    </div>
  );
}

export default App;
Now, let’s create the two components that we’ll use to demonstrate protected vs non protected routes.
touch src/components/NormalRoute.js
touch src/components/ProtectedRoute.js
// src/components/ProtectedRoute.js
import React from "react";
import { connect } from "react-redux";

class ProtectedRoute extends React.Component {
  render() {
    return (
      <div className="w-11/12 max-w-6xl mx-auto mt-8 text-2xl">
        This is a protected route. It should only be visible to a user who is signed in.
      </div>
    );
  }
}

export default connect()(ProtectedRoute);
// src/components/NormalRoute.js
import React from "react";

export default function NormalRoute() {
  return (
    <div className="w-11/12 max-w-6xl mx-auto mt-8 text-2xl">
      This is a normal route. It should be accessible to anyone, whether they're logged in or not.
    </div>
  )
}
When we visit the protected route in the browser, we should not see it here because we’re not currently logged in.
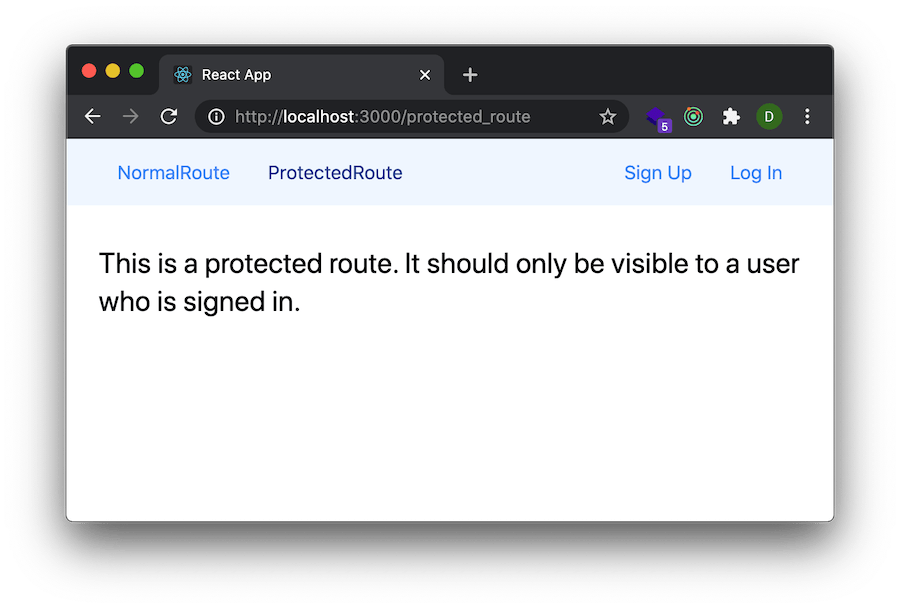
But, in fact we do. That makes sense at the moment because we haven’t added the logic that would prevent us viewing this route if we’re not logged in. This is where our withAuth higher order component will come into play.
Building the withAuth higher order component
The purpose of the withAuth higher order component is to access the authStatus and only display the component it wraps when the user is authenticated. To support this component, we’ll need to add an additional action creator that will hit the API to check if the user has a valid JWT in localStorage and can therefore view the protected component.
Our new action creator will be called checkAuth and we’ll use it within the withAuth component to determine whether to show a loading spinner, redirect to the login page or show them the wrapped component. Here’s what our action creator will look like.
// src/actions/auth.js
// ...
export const checkAuth = () => {
  return (dispatch) => {
    return fetch("http://localhost:3001/current_user", {
      headers: {
        Accept: "application/json",
        "Content-Type": "application/json",
        Authorization: getToken()
      }
    }).then((res) => {
      if (res.ok) {
        return res.json().then(user => dispatch({type: AUTHENTICATED, payload: user}))
      } else {
        return Promise.reject(dispatch({type: NOT_AUTHENTICATED}))
      }
    });
  };
};
The higher order component (HOC) pattern is somewhat advanced. But, perhaps we can use the connect HOC from react-redux as an example. The point of the connect HOC is to allow us a reusable pattern for giving components throughout our application the ability to publish actions to update the store and subscribe to changes in the state. Wherever we have a component that needs access to the store, we can wrap it in connect to give it that access.
In our case, withAuth will function much like authenticate_user! would on a rails backend. It will serve as a bouncer preventing access to a component until we’ve checked that a valid session is present. In any event, the way that higher order components work is they take a component as an argument and return another component that will render that wrapped component. In this case, we’ll set up a situation where we’ll use the checkAuth action creator and only render the wrapped component if we get a user back from the api. If we don’t it will render the Login component. If they then fill in the login form and successfully authenticate, it will render the wrapper component.
touch src/components/auth/withAuth.js
// src/components/auth/withAuth.js
import React from "react";
import { connect } from "react-redux";
import { checkAuth } from "../../actions/auth";
import LoadingSpinner from "../LoadingSpinner";
import Login from "./Login";

function withAuth(WrappedComponent) {
  class Wrapper extends React.Component {
    componentDidMount() {
      this.props.dispatchCheckAuth();
    }

    render() {
      if (!this.props.authChecked) {
        return <LoadingSpinner />;
      } else if (!this.props.loggedIn) {
        return (
          <>
            <Login />
            <p>You need to login to view this page.</p>
          </>
        );
      } else {
        return <WrappedComponent {...this.props} />;
      }
    }
  }

  const mapStateToProps = ({
    auth: { authChecked, loggedIn, currentUser }
  }) => {
    return { authChecked, loggedIn, currentUser };
  };

  const mapDispatchToProps = (dispatch) => {
    return {
      dispatchCheckAuth: () => dispatch(checkAuth())
    };
  };

  return connect(mapStateToProps, mapDispatchToProps)(Wrapper);
}

export default withAuth;
we’ll also trigger it within our Navbar component later on so we can decide what authentication related links should be displayed to the user. If we have an active session, we’ll show the logout button, if not, we’ll show the links to Sign Up and Log In.
Setting up a Loading spinner
To get the withAuth component working, we’ll need to create a LoadingSpinner component. To do that, we’ll want to install the react-icons library. We’re going to make this one cover the full screen and block clicking on anything below, but we could add additional props to the spinner to allow it to take up a smaller space if we wanted.
yarn add react-icons
touch src/components/LoadingSpinner.js
For now, our loading spinner component will consist of an overlay that will take take up the entire screen. We’ll use flexbox to center the spinner on the screen vertically. We’ll have an inner div that will have a fixed width and auto margin to center it horizontally. Finally, we’ll add an animate-spin class to the <ImSpinner3> so it will rotate.
// src/components/LoadingSpinner.js
import React from "react";
import { ImSpinner3 } from "react-icons/im";

const LoadingSpinner = () => {
  return (
    <div className='fixed top-0 flex items-center w-screen h-screen z-20 bg-gray-700 bg-opacity-70'>
      <div className='text-5xl text-white text-center w-10 mx-auto'>
        <ImSpinner3 className='animate-spin' />
      </div>
    </div>
  );
};

export default LoadingSpinner;
Using the withAuth component to make a route protected
Finally, when we hook up the routes in our App component, we can import withAuth and wrap our protected routes in it.
// src/App.js
import { BrowserRouter as Router, Route, Switch } from "react-router-dom";
import Navbar from "./components/Navbar";
import NormalRoute from "./components/NormalRoute";
import ProtectedRoute from "./components/ProtectedRoute";
import Signup from "./components/auth/Signup";
import Login from "./components/auth/Login";
import withAuth from "./components/auth/withAuth";


function App() {
  return (
    <div className='App'>
      <Router>
        <Navbar />
        <Switch>
          <Route exact path='/' component={NormalRoute} />
          <Route
            exact
            path='/protected_route'
            component={withAuth(ProtectedRoute)}
          />
          <Route exact path='/signup' component={Signup} />
          <Route exact path='/login' component={Login} />
        </Switch>
      </Router>
    </div>
  );
}

export default App;
Now, when we visit /protected_route in the browser, we’ll briefly see the loading spinner and then we’ll see the message that we need to log in to see this page.
We don’t currently have an account set up, so we need to sign up first and then we should be able to view the protected route.
Configuring authentication based Nav Links
Almost there! We have a couple more things to do here. First, we want to add some conditional logic to the <Navbar /> component so that we can display a logout button if we’re logged in and the Sign Up and Login links if we’re not.
// src/components/Navbar.js
import React from "react";
import { connect } from "react-redux";
import { NavLink } from "react-router-dom";
import Logout from "./auth/Logout";

const Navbar = ({ authChecked, loggedIn, currentUser }) => {
  return (
    <nav className='bg-blue-50 text-blue-500'>
      <div className='w-11/12 max-w-6xl mx-auto grid sm:grid-cols-3 md:grid-cols-4'>
        <div className='sm:col-span-2 md:col-span-3'>
          <NavLink
            className='p-4 block sm:inline-block'
            activeClassName='text-blue-900'
            exact
            to='/'
          >
            NormalRoute
          </NavLink>
          <NavLink
            className='p-4 block sm:inline-block'
            activeClassName='text-blue-900'
            exact
            to='/protected_route'
          >
            ProtectedRoute
          </NavLink>
        </div>
        <div className='sm:text-right'>
          {loggedIn ? (
            <>
              {currentUser.email}
              <Logout />
            </>
          ) : (
            <>
              <NavLink
                className='p-4 inline-block'
                activeClassName='text-blue-900'
                exact
                to='/signup'
              >
                Sign Up
              </NavLink>
              <NavLink
                className='p-4 inline-block'
                activeClassName='text-blue-900'
                exact
                to='/login'
              >
                Log In
              </NavLink>
            </>
          )}
        </div>
      </div>
    </nav>
  );
};

const mapStateToProps = ({ auth: { authChecked, loggedIn, currentUser } }) => {
  return { authChecked, loggedIn, currentUser };
};

export default connect(mapStateToProps)(Navbar);
We’re sooo close! So this currently works properly, but if we reload the page and we’re not on the protected route, the navbar will reset to the logged out state.
This is not what we want. We should still maintain our logged in status and the navbar should show the active user’s email. To do that, we need to import the checkAuth action creator and use it in mapDispatchToProps. This also means we’ll need to convert our component to a class based component, as we’re not using hooks for this demo and we’ll need to introduce componentDidMount to trigger the dispatch.
// src/components/Navbar.js
import React from "react";
import { connect } from "react-redux";
import { NavLink } from "react-router-dom";
import Logout from "./auth/Logout";
import { checkAuth } from "../actions/auth";

class Navbar extends React.Component {
  componentDidMount() {
    this.props.dispatchCheckAuth();
  }

  renderAuthLinks() {
    const { authChecked, loggedIn, currentUser } = this.props;
    if (authChecked) {
      return loggedIn ? (
        <>
          {currentUser.email}
          <Logout />
        </>
      ) : (
        <>
          <NavLink
            className='p-4 inline-block'
            activeClassName='text-blue-900'
            exact
            to='/signup'
          >
            Sign Up
          </NavLink>
          <NavLink
            className='p-4 inline-block'
            activeClassName='text-blue-900'
            exact
            to='/login'
          >
            Log In
          </NavLink>
        </>
      );
    } else {
      return null
    }
  }

  render() {
    return (
      <nav className='bg-blue-50 text-blue-500'>
        <div className='w-11/12 max-w-6xl mx-auto grid sm:grid-cols-3 md:grid-cols-4'>
          <div className='sm:col-span-2 md:col-span-3'>
            <NavLink
              className='p-4 block sm:inline-block'
              activeClassName='text-blue-900'
              exact
              to='/'
            >
              NormalRoute
            </NavLink>
            <NavLink
              className='p-4 block sm:inline-block'
              activeClassName='text-blue-900'
              exact
              to='/protected_route'
            >
              ProtectedRoute
            </NavLink>
          </div>
          <div className='sm:text-right'>
            {this.renderAuthLinks()}
          </div>
        </div>
      </nav>
    );
  }
}

const mapStateToProps = ({ auth: { authChecked, loggedIn, currentUser } }) => {
  return { authChecked, loggedIn, currentUser };
};

const mapDispatchToProps = (dispatch) => {
  return {
    dispatchCheckAuth: () => dispatch(checkAuth())
  };
};

export default connect(mapStateToProps, mapDispatchToProps)(Navbar);
If we haven’t checked auth yet, we’re returning null from our renderAuthLinks method. This is so we don’t display the auth links in the navbar until after we know if we have a logged in user or not. This will prevent us seeing Sign Up and Login links briefly before we see our email and the logout link.
Once we’ve got this set up, the Navbar component will have the knowledge and ability to display the correct links to the user, whether they’ve got an active session or not. We’ll also maintain that ability after navigating away from the site (as long as we come back within the half hour that our token is valid).